Absolute contraindications of thoracocentesis
There are no absolute contraindications to diagnostic thoracocentesis. If clinical judgement dictates that the information gained from the pleural fluid analysis may help in diagnosis and therapy, thoracocentesis should be performed. 1
Necessity of an immediate alternative procedure such as open thoracostomy or thoracotomy is the only absolute contraindications to thoracocentesis. 2
Another book mentions absolute contraindications as coagulopathy, known adhesions and a history of pleurodesis. If the patient is symptomatic and coagulopathic, correction of coagulopathy and ultrasonographic guidance are recommended to minimize bleeding risks. 3
Thoracocentesis must not be done on pleural effusions demonstrated to be less than 1-1.5 cm thick by ultrasound or on a lateral decubitus film. 4
Position of the patient for Thoracocentesis
Ideally, the patient should be seated comfortably, slightly leaning forward with arms abducted, and lying comfortably on a table or stand in front of them. This position allows fluid to reach a dependent portion of the thorax and draws the scapulae anterolaterally to improve exposure.
Patients unable to sit may be situated in a lateral decubitus position. 5
Needle insertion site for Anesthesia and Thoracocentesis
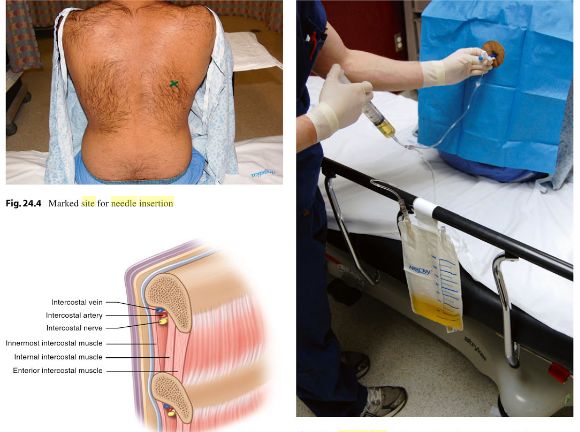
Confirm the air-fluid level by percussion, auscultation and chest radiograph. Use an area 1 or 2 intercostal spaces below the fluid level and 5-10 cm lateral to the spine or midscapular line.6
Do not insert below the 8th intercostal space because respiratory cycle and anatomical variation place the diaphragm and intra-abdominal organs at risk.
Short review of surface anatomy of pleura: From its most superior edge, the pleura lie approximately 2.5 cm above the medial third of clavicle and inferior to the sternocleidomastoid muscle. Inferiorly, the pleura crosses the 8th rib at the midclavicular line, the 10th rib at the midaxillary line and the 12th rib at the lateral border of erector spinae.
“Walk” the needle over the superior margin of the rib, not under it, to avoid damaging vessels and nerves. Recall that the intercostal neurovascular bundle passes along the inferior rib margin.
Needle insertion site for thoracocentesis of tension pneumothorax: Insert a 2-inch, large-bore (12 or 14 G) IV catheter through the chest wall and into the pleural space between the second and third intercostal space, in the midclavicular line.
Technique of Local Anesthesia for Thoracocentesis
- The skin is anesthesized using a short 25 G needle by injecting enough lidocaine, approximately 0.5 ml to raise a small wheal.
- The needle is inserted to the periosteum of the underlying rib and is moved up and over the rib with frequent injections of small amounts (0.1 to 0.2 ml) of lidocaine.
- Once this needle is superior to the rib, it is slowly advanced toward the pleural space with aspiration, followed by the injection of 0.1 to 0.2 ml of lidocaine every 1 to 2 mm.
- As soon as the pleural fluid is aspirated through this needle into the syringe containing lidocaine, the needle should be withdrawn from the pleural space and diagnostic or therapeutic thoracocentesis is proceeded. 7
Catheter over needle technique for Thoracocentesis
- When the pleural space is reached, do not advance the needle further. Advance the catheter over the needle until the hub reaches the skin.
- Remove the needle during expiration and immediately cover the open hub with a gloved finger to prevent development of pneumothorax.
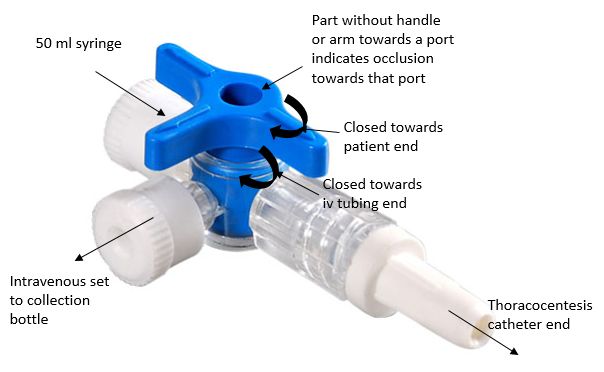
- Attach the 50 ml syringe to catheter via the three-way stopcock. A collection bag may be attached with tubing to the third port of a three-way stopcock.
- Fill the syringe by withdrawing the plunger while the stopcock is closed to the bag. Then, close the stopcock to the patient and pump the contents of the syringe to the bag. Next, close the syringe closed to the bag, and repeat the cycle until the desired volume is drained.
- If using a three way cock and device that does not have a one-way valve on the catheter, be sure to always keep the stopcock closed to the patient unless withdrawing fluid in order to decrease the risk of pneumothorax.
- When desired amount of pleural fluid is obtained, remove the catheter during expiration and apply an occlusive dressing.
How much fluid can be safely removed during therapeutic throacocentesis?
Ideally, monitoring pleural pressure should dictate the amount of fluid that can be removed. As long as the intrapleural pressure doesn’t fall to less than -20 cm of H2O, fluid removal can continue. However, intrapleural pressure monitoring is not done routinely.
Drain a maximum of 1.5 l of fluid in one sitting (risk of re-expansion pulmonary edema following sudden removal of very large volumes). Stop the procedure if resistance is felt, or the patient experiences discomfort or severe coughing. When the lung has been collapsed for more than a week and large (>1.5 L) volumes are being drained as reperfusion edema complicates 2-7 % of large volume thoracocentesis. 8
Re-expansion Pulmonary Edema (RPE)
The risk factors for developing re-expansion pulmonary edema are:
- Collapse of the affected lung for more than 3 days
- Large pneumothorax
- Negative pleural suction of >20 cm of H2O
- Rapid re-expansion
Pathogenesis: The pathogenesis of RPE involves two main entities – alterations of capillary permeability and increased hydrostatic pressure. Inflammatory mediators, such as neutrophils, IL-8 and leukotrienes, may play a role in the development of RPE. Similarly, re-oxygenation of the collapsed hypoxic lung may contribute to RPE through oxygen free radical generation and leukocyte influx during re-expansion or re-oxygenation of the collapsed lung.
Clinical features:
- Coughing spells or chest tightness during or immediately after tube thoracostomy or thoracocentesis.
- The symptoms usually progress for 12-24 hours and serial chest radiographs reveal progressive ipsilateral pulmonary edema, which may progress to involve the contralateral lung.
- If the patient does not die within the first 48 hours, recovery is usually complete.
Treatment: Treatment is primarily supportive with the administration of supplemental oxygen and diuretics; intubation and mechanical ventilation may be necessary.9
Thoracocentesis during positive pressure ventilation
Few authors have recommended this condition as a relative contraindication to thoracocentesis due to risk of puncturing lung during inflation. In addition, ventilated patients will not be able to sit upright and will need to have the procedure performed in lateral decubitus position with the effusion side down and the posterior axillary line as the needle insertion site. Alternatively, the patient can be positioned supine with the head of the bed elevated to 45 degrees and the midaxillary line as the needle insertion site. 10
Pneumothorax following thoracocentesis
There are 3 reasons why a pneumothorax may occur following thoracocentesis:
- Accidental laceration of lung parenchyma: easily recognized at the time of thoracocentesis by air bubbles coming into pleural fluid
- Accidental entry of air through the catheter and needle into the pleural space (if left in hemithorax, air will be approximately absorbed in the rate of 1% per day)
- Trapped lung in patients with chronic pleural effusion, empyema or pleural thickening or malignancy or mesothelioma. 11
Accidental puncture of lung during thoracocentesis
Normally the puncture in the lung seals and air is absorbed spontaneously. More severe leaks are caused by coughing or needle movement, which causes a larger tear in the lining of the lung. These injuries may require a chest tube to re-inflate the lung.
The clamp may be used to stabilize the needle at the skin to prevent accidental additional penetration of the needle down to the lung. 12
Post-thoracocentesis X-ray
Indications:
- Onset of chest pain during the procedure
- Persisting cough or chest discomfort after the procedure
- Air aspiration along any step of the procedure
- Positive pressure ventilation