Indications of chest tube insertion
- Pneumothorax:
- In any ventilated patient (positive airway pressure will force air into the pleural cavity and produce tension pneumothorax)
- Tension pneumothorax after initial needle thoracocentesis
- Persistent or Recurrent pneumothorax after simple aspiration
- Large secondary spontaneous pneumothorax in patients >50 years
- Pleural effusion:
- Malignant pleural effusion
- Empyema and complicated parapneumonic effusions
- Simple pleural effusions in ventilated patients
- Chylothorax
- Trauma: Traumatic pneumothorax or hemopneumothorax
- Postoperative: thoracotomy, esophageal surgery, cardiothoracic surgery
Contraindications of chest tube insertion
- Absolute: When lung is completely adherent to the chest wall throughout the hemithorax
- Relative: Coagulopathies and platelet defects (whenever possible correct this first !)
Equipments required for chest tube insertion
- Sterile gloves and gown
- Skin antiseptics
- Sterile drapes
- Gauze swabs
- Syringes and needles (21–25 gauge)
- Local anaesthetic, e.g. lignocaine (lidocaine) 1% or 2%
- Scalpel and 11 no. blade
- Suture (e.g. “1” silk)
- Instrument for blunt dissection (e.g. curved Kelly clamps or artery forceps)
- Chest tube of appropriate size
- Connecting tubing
- Closed drainage system (including sterile water if underwater seal being used)
- Dressing
Selection of Chest tube of Appropriate Size
- Spontaneous uncomplicated pneumothorax: 16 to 22 Fr (small bore)
- Unstable patient, bronchopleural fistula or Mechanical ventilation: 24 to 28 Fr
- Complicated pneumothorax or hemothorax (trauma): 32 Fr (large bore)
- Some recommend 36-40 Fr in hemothorax
- Smore recomment nothing larger than 32 Fr
- Pediatric: 4 X ET-tube size
- ET-tube size = age/4 + 4
- For Seldinger technique of insertion: 14 Fr
Note: 1 mm = 3 Fr
Relevant anatomy and physiology
- Amount of pleural fluid in 24 hours is 0.3 ml/kg
- Negative intrapleural pressure keeps the lung expanded:
- During inspiration: -8 cm of water
- During expiration: -4 cm of water
- Hence, air or effusion in pleural space disrupts this negative pressure and leads to lung collapse
- Layers that must be breached when inserting a chest tube are: skin, subcutaneous tissue, intercostal muscle and parietal pleura
- The intercostal spaces are filled with intercostal muscles, with the vein, artery, and nerve lying in the costal groove along the inferior margin of the superior rib from above downwards and situated between the second and the third layer of muscle. To avoid the neurovascular bundle, it is normally advocated that the drain be located in the interspace just superior to the rib.
-
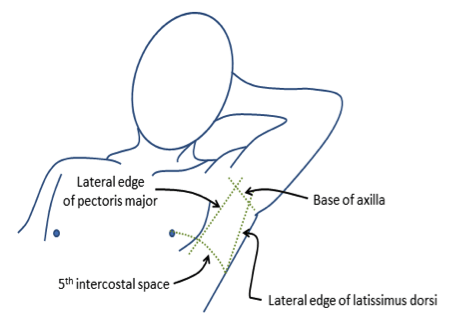
Triangle of safety:
- Routine use of ultrasound before insertion of chest tube is recommended whenever feasible
- In cases of severe cardiomegaly and distorted thoracic anatomy, blind insertion of a chest tube through the ‘safe triangle’ is not safe.
- The midaxillary line is the most commonly advocated position for tube thoracostomy; the innermost layer of intercostal muscle being poorly developed at this point, and comprising thin intracostals, which blend with the internal intercostal layer except where separated by neurovascular bundles
- “Triangle of safety” is a triangular zone formed by lateral border of pectoralis major, anterior border of latissimus dorsi and upper border of the 5th rib.
- This positioning minimizes risk of injury to the internal mammary artery, muscle or breast tissue.
- In full expiration, the two domes rise as high as the 4th dorsal intervertebral space on the right and 5th space on the left; hence, when a chest tube is placed too low, there is a high probability of abdominal placement. Inferior placement of chest tubes will not only perforate the diaphragm but will also damage intra-abdominal organs. The same will also apply to other conditions that elevate the diaphragm, for example, late pregnancy, gross obesity, massive ascites, and intraabdominal tumours.
- Chest tubes placed laterally in the fifth, sixth or seventh intercostal space will enter the chest near the oblique fissure and if directed centrally can enter the fissure
Characteristics of Chest tube
- Composition: PVC or Silicone
- Size: Already discussed above (measured in external diameter in Fr)
- In conventional chest tubes, the length of the tube is marked with numbers to indicate distance inserted into the chest wall. Note that they are numbered relative to the the chest, not to the drainage hole on the chest tube. Located at the distal end of the tube are several drainage holes.
- A radio-opaque stripe runs along the length of the tube and outlines the most proximal drainage hole. This is used to confirm correct placement of the tube in the pleural space on CXR post-insertion.
- Configuration: curved or straight
- 3 types:
- Thoracotomy chest tubes
- Trocar chest tube
- Malecot catheter
Characteristics of Collection chamber
- One bottle system:
- distal end of the tube must be atleast 2 cm under water (the seal) in the underwater-seal bottle
- another vent tube is open to atmosphere
- pleural pressure greater than +2 cm water will force air or fluid from the pleural space into the bottle while negative pressure in the pleural space will suck fluid up the tube
- As long as the underwater-seal bottle is well below the patient (about 100 cm), the hydrostatic pressure of the fluid column in the tube will counterbalance the negative pleural pressure and prevent water from being sucked into the pleural space
- A disadvantage of this single bottle system is that, as liquid content (blood, pus, effusion fluid) is expelled from the pleural space and collects in the underwater-seal bottle, the seal tube becomes immersed deeper under water and the pressure required to force more contents into the bottle increases thus impeding the clearance of the pleural collection
- Two bottle system:
- Separate chamber for water-seal system and collection chamber
- Advantage: Amount and rate of drainage can be measured and also the water-seal system remains fixed
- Three bottle system:
- Additional suction control bottle (pressure regulating bottle) to the two bottle drainage system
- Manometer or pressure-regulating bottle allows suction to be attached and should bubble continuously
- The maximum negative pressure (in cm H2O) generated by suction equals to the distance (in cm) the vent tube is below the water line (this can be adjusted
- The negative pressure generated by the vent tube is independent of the amount of pleural drainage that is collected in the trap bottle
- Heimlich valve: It is a mechanical one way valve that allow air to escape from the chest and prevent air from entering chest (doesn’t require water to operate and is not position sensitive)
Bubbling in the water-seal chamber
If you note bubbling in the water-seal chamber, it is either due to air escaping through the pneumothorax or air-leak. Clamp the chest tube momentarily, beginning at the patient. Look at the chamber to see whether the bubbling has stopped. If you clamp and the bubbling goes away, the leak is coming from the chest. If you clamp at the chest and the bubbling persists, the leak is between the clamp and the water seal chamber.
Procedure for chest tube insertion
- Consent
- Premedication: Chest drain insertion has been reported to be a painful procedure with 50% of patients experiencing pain levels of 9–10 on a scale of 10 in one study. Premedication could be an intravenous anxiolytic—for example, midazolam 1–5 mg titrated to achieve adequate sedation—given immediately before the procedure or an intramuscular opioid given 1 hour before.
- Patient position:
- Backrest lifted to 45 degrees with arms abducted and hands resting behind the head (This lowers the diaphragm and decreases the risk of injury to the diaphragm, spleen, or liver) OR
- Upright position leaning over pillow or table OR
- Lateral decubitus
- Painting and draping
- Anesthesia:
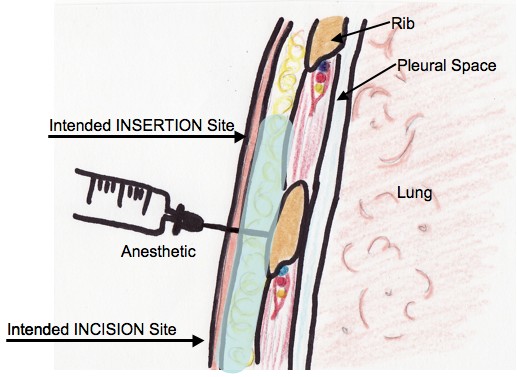
- The skin, subcutaneous tissues, parietal pleura, and periosteum of the rib below the intended insertion site (ie. the rib above the marked incision site) must be adequately anesthetized. Up to 7 mg/kg of locally injected 1% lidocaine with epinephrine (1:100,000) can be used (up to 5 mg/kg if not using epinephrine). Using a small gauge needle (i.e. >25 gauge), create a wheal of anesthetic in the skin overlying the landmarked spot where the incision will be made.
- Using the larger gauge needle (i.e. 20-22 gauge), anesthetize the subcutaneous tissues through the wheal, aspirating as the needle moves deeper.
- Anesthetize the periosteum of the rib that lies below the intercostal space where the tube will be inserted
- Once you have reached the parietal pleura, a flash of pleural fluid will fill the syringe if a pleural collection is being evacuated. If a pneumothorax is being drained, the syringe may only fill with air. Withdraw the needle, aspirating along the entire path. If air or fluid are not found, the insertion site should be changed.
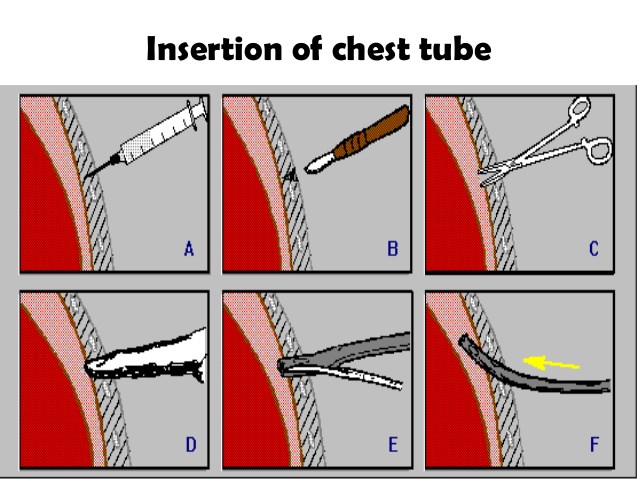
- Incision and dissection:
- With the scalpel, create a 1.5 to 2cm incision through the skin at the marked incision site
- With a curved blunt dissecting instrument (e.g. Kelly clamp), dissect the subcutaneous tissues until the intercostal muscle layer is reached
- Staying on top of the rib to avoid the neurovascular bundle running along the inferior rib margin, guide the blunt dissecting instrument upwards, towards the insertion site. This will create a diagonal path for the chest tube which is thought to provide a better seal against air leaks
- If using a larger caliber chest tube (24-Fr or greater), use your index finger to explore the tract created by the instrument, this will ensure that the tract will be large enough to accommodate the larger tube
- Once you have reached the parietal pleura, push the clamp gently through the parietal pleura, you should feel a “give”, or a release of resistance. Alternatively, you may use your finger to advance into the parietal space. Often, pleural fluid may trickle out through the tract
- Once you have gained access to the pleural space, use your index finger to make sure the lung is not adherent to the pleural wall as this would impede the passage of the tube. If possible, leave your finger in the tract as a guide for the tube.
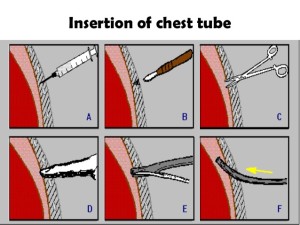
- Chest tube insertion:
- Clamp the free end of the tube
- Using your finger as a guide, pass the tube into the pleural space. This allows you to feel the tube entering the pleural space and avoid subcutaneous dissection with the tube.
- Never force a tube into the pleural space
- Direction of tube: To drain air (anterior and superior towards apex) and To drain fluid (posterior and inferior towards base). However, successful drainage can still be achieved when the drain is not placed in an ideal position.
- Securing the drain:
- Two sutures are usually inserted—the first to assist later closure of the wound after drain removal and the second, a stay suture, to secure the drain.
- Purse string sutures are not recommended due to poor cosmetic results and increased risk of skin necrosis
- Dressing: Apply several pieces of sterile gauze cut in a “Y-cut” fashion around the tube with the Y-cuts at 90o angles to each other. Apply adequate dressing.
- Connect to drainage chamber:
- Connect to drainage chamber and secure with tapes
- Unclamp the free end of the tube
- Rise in fluid level indicates effusion and bubbling indicates pneumothorax
- To avoid re-expansion pulmonary edema when evacuating chronic large pulmonary effusions, avoid collection of 1.5 L or more within a 30 minute period
- Confirming correct placement of tube:
- A CXR must be done to ensure the correct placement of the tube.
- The radiopaque stripe should be visible, with an interruption indicating the placement of the proximal drainage hole, this hole must be within the pleural space. If the interruption lies outside the pleural space, the tube is not draining effectively. In this instance, the tube must be removed and replaced altogether.
- Clamping chest tube: A bubbling chest drain should never be clamped. It should be clamped only in following conditions:
- Prior to removal of chest tube, to assess if patient can do without it
- Assessing for air-leak
- Changing the chest drainage unit
- To prevent re-expansion pulmonary edema
Complications of chest tube
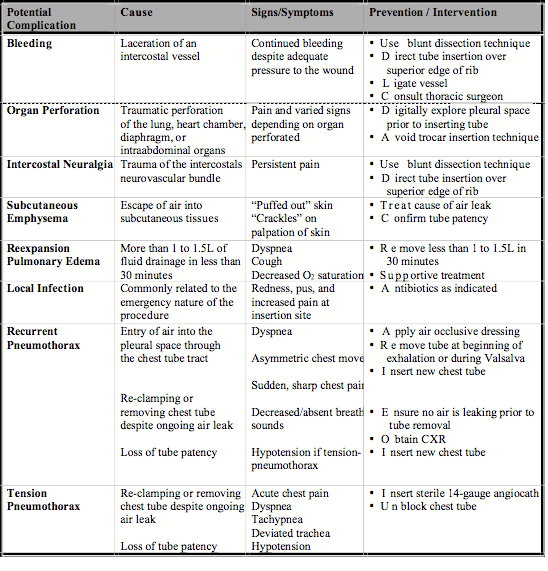
1. Tube malposition: Intraparenchymal, fissural, extrathoracic or angulation in pleural space
2. Tube blockage: Due to kinking, angulation, clot or debris tube may be blocked which is indicated by the failure in fluctuation of fluid withing chest tube with respiration or coughing. It should be managed by milking of the tube or unkinking of the tube.
3. Tube dislodgement: If the tube is dislodged, it must be reintroduced through a new site under all aseptic precautions.
4. Re-expansion pulmonary edema (REPE): It occurs due to mechanical stress placed on endothelium and blood vessels and also the increase in oxygen free radicals and scavengers during the process of re-expansion. Clinical picture varies from asymptomatic radiologic findings to dramatic respiratory failure with circulatory shock. Patient usually becomes symptomatic within 2 hours after rapid lung reexpansion. There may be frothy sputum production associated with tachypnea, tachycardia, and cyanosis. Auscultation may reveal rales, and chest radiograph will reveal the presence of pulmonary infiltrates with ground glass appearance. Treatment includes haemodynamic support (vigorous resuscitation and vasopressors), administration of supplemental oxygen, and, if need be, mechanical ventilation with positive end-expiratory pressure (PEEP). In cases of unilateral REPE, positioning the patient in lateral decubitus position with the affected side up will reduce intrapulmonary shunting and improve oxygenation.
Chest tube removal
a. Indications:
- Less than a total of 10ml/tube/hour for 6 hours (<10cc x 6h for paediatrics)
- Chest Xray shows re-expansion of lungs
- No air leak present
b. Procedure:
- Do not clamp tube at the time of removal for pneumothorax. Else, clamp for less than 24 hours and assess the fitness of patient.
- Ask to perform a valsalva maneuvere
- Remove drain at the height of expiration. One operator can pull the tube out while the other quickly occludes the site with gauze, adds additional sutures to close the opening, and secures the site with a pressure dressing.
- Post-procedure Chest-X-ray(after 12-24 hours) to rule out pneumothorax
References
- BTS guidelines for the insertion of a chest drain
- NHS guidelines for the insertion and management of chest drains
- Chest tube insertion (NEJM)
- Chest tube and Chest drainage systems (LHSC)
- Tube thoracostomy: Complications and its management (Hindawi)