Written on August 10, 2025
And once again, today’s case reminded me that removing orthopedic implants can be more challenging than inserting them – especially when faced with a stubborn, stripped or jammed locking screw.
We operated on a 25-year-old female with a united distal radius fracture, aiming to remove her titanium volar locking plate. While most screws came out smoothly, two of them decided to test our patience and technique.
Jammed Distal Locking Screw
One distal locking screw was jammed in place, and after a few turns, the head began to strip.
Solution:
We hammered a stardrive screwdriver shaft into the screw head to create a tight, fresh grip. This gave us enough purchase to engage the threads and back the screw out successfully.
Tip: A gentle but firm hammering of the driver helps re-seat it and can deform the head slightly for a snug fit.
Jammed Proximal Locking Screw
The second troublemaker was a proximal screw – completely jammed and refusing to turn. After repeated attempts, we decided to change our strategy:
We bent the plate from its distal end to disengage the locking interface between screw and plate.
Freed the plate from the bone both distally and proximally.
Then came the Helicopter Technique:
- Rotate and twist the plate around the axis of the jammed screw while pulling gently, allowing the screw head to “unscrew” itself mechanically from the plate hole.
- The plate is removed over the screw, leaving the screw in situ (if not easily retrievable).
- This avoided unnecessary bone damage and let us complete the procedure without complications.
Lets get into some discussions.
Radial plate cut + Osteotome wedge
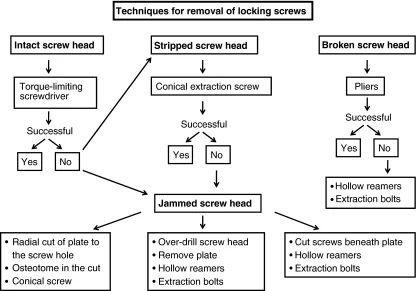
A high-speed disc can be used to make a radial cut from the plate edge to the edge of the screw hole, and a 10-mm osteotome wedged in that cut. When the osteotome is wedged in the radial cut, the circumference of the threaded portion of the screw hole will increase. This release the screw head and removing the distal bicortical screws becomes possible with the conical extraction screw.
Source: https://pmc.ncbi.nlm.nih.gov/articles/PMC3018209/
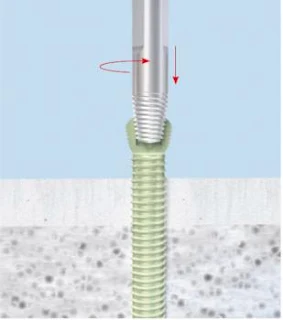
Conical extraction tool
- Align the conical extractor tip with the damaged recess.
- Tap it in to create purchase by biting into the soft titanium/steel.
- Rotate counterclockwise to remove screw.
Using high-speed carbide burr
Moist pads are placed around the stripped locking screw to protect the surrounding soft tissues from metal debris generated during the destruction of the screw head.
A 3.0 ball burr is attached to a standard orthopedic machine. The burr is used to completely destroy all surfaces of the locking screw head that are in contact with the plate. Throughout this procedure, continuous irrigation and aspiration with saline at room temperature are performed to prevent thermal necrosis.
By destroying the locked screw head, the plate is released. The plate is then removed by maneuvering it with an osteotome from the bone-plate interface.
If the remaining screw tip is sufficiently long, it can be removed by grasping it with locking pliers or a T-handle and turning it. If there is not enough screw tip exposed to grasp, the screw is removed by freeing the area around it using a trifine.
Source: https://josr-online.biomedcentral.com/articles/10.1186/s13018-025-05823-y
Using a hollow mill
Cold welding all around the head of the screw can create “screw head – plate hole” assembly as a mono-block single unit. In such a situation, enlarging the hole of the plate by grating the soft titanium cold welded metal/metal around the plate hole by the stainless steel hollow mill proves to be a good alternative. Since the principle of the present technique is based on the enlarging of the size of hole in the plate rather than reducing the size of the screw head, the technique can be applicable to the stripped screws in the case of cold welded locking screws as well.
Source: Hollow Mill for Extraction of Stripped Titanium Screws: An Easy, Quick, and Safe Technique – PMC
Helicopter technique
All non-cold-welded screws are removed in conventional fashion. A high-speed carbide burr is then used to cut the plate either side of the cold-welded screws. The burr removes metal, leaving a gap between the cut ends of 3–5 mm to allow removal. Constant irrigation disperses the heat generated and adjacent tissues are protected with damp swabs so debris can be easily removed. Each cold-welded screw plate section may then be removed by twisting them anticlockwise – the ‘helicopter technique’, either by hand or with pliers.
Source: The helicopter technique: a technique for removing cold-welded titanium plates – PMC

He is the section editor of Orthopedics in Epomedicine. He searches for and share simpler ways to make complicated medical topics simple. He also loves writing poetry, listening and playing music. He is currently pursuing Fellowship in Hip, Pelvi-acetabulum and Arthroplasty at B&B Hospital.