Content: 1-2% fluorescein dye impregnated
Method of use:
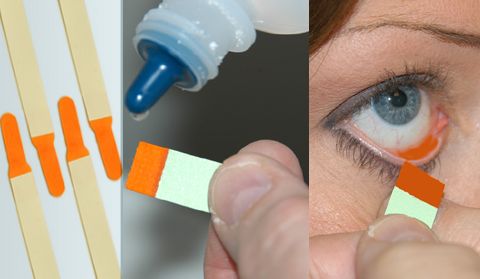
- Explain the procedure to the patient
- Ask the patient to look up
- Moisten the strip with a small amount of normal saline or anesthetic drops, without touching the dye impregnated end of the strip with dropper
- Gently touch the inside of the lower eyelid with the moistened strip without touching cornea
- Allow fluorescein dye to diffuse approximately 30 seconds
- Scan the cornea or bulbar conjunctiva for areas of dye uptake that appear bright green with blue light (slit lamp)
Note:
Alternatively, fluorescein drops can also be used.
If there is an evidence of anterior segment disease in one eye, use the strip on the uninvolved eye first or use separate strip for each eye.
Uses:
1. Lacrimal testing:
- Dry eye: Tear film Break-Up Time (BUT)
- Watering eye: Fluorescein Dye Disappearance Test (FDDT), Jone’s Dye Test
Tear film BUT: It is the interval between a complete blink and appearance of first randomly distributed dry spot on the cornea. It is noted after instilling a drop of fluorescein and examining in a cobalt-blue light of a slit-lamp. BUT is an indicator of adequacy of mucin component of tears. Its normal values range from 15 to 35 seconds. Values less than 10 seconds imply an unstable tear film.
FDDT: Instill fluorescein in inferior fornix of both eyes, wait 5 minutes, then evaluate for asymmetric clearance of dye from tear meniscus. A prolonged retention of dye in conjunctival sac indicates inadequate drainage which may be due to atonia of sac or mechanical obstruction.
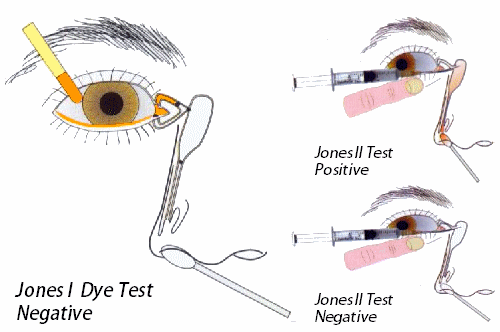
Jones Dye Test:
a. Jones I test: perform dye disappearance test, then attempt to recover fluorescein in inferior nasal meatus with cotton-tipped applicator after 5 minutes; abnormal result (no fluorescein) occurs in 33% of normal individuals. If the dye is retained in cotton-tipped applicator, the cause of tearing is probably hypersecretion i.e. epiphora.
b. Jones II test: perform Jones I test, then irrigate saline into nasolacrimal system; dye recovery from nose indicates functional occlusion of nasolacrimal duct; clear saline recovery indicates canalicular occlusion or nonfunctioning lacrimal pump.
2. Detection of corneal epithelial defects
Fluorescein stains epithelial defects; negative staining occurs in areas of epithelial irregularity
Pattern gives clue to etiology:
- Interpalpebral: dry eye
- Horizontal band across inferior 1/3 of cornea: lagophthalmos/exposure
- Superior punctate: SLK, floppy eyelid syndrome
- Central punctate: focal epithelial keratitis (Thygeson’s SPK, epidemic keratoconjunctivitis, molluscum)
- Inferior punctate: blepharitis
- Perilimbal (360°): soft contact lens wear
3. Detection of penetration of globe (Seidel’s test)
Seidel’s test: A drop of fluorescein is instilled into the lower fornix and patient is asked to blink to spread the dye evenly. On examination with slit lamp using cobalt-blue filter, fluorescein will be diluted by aqueous at the site of leakage.
4. Applanation tonometry
Goldmann tonometer: After anaesthetising the cornea with a drop of 2 per cent xylocaine and staining the tear film with fluorescein patient is made to sit in front of slit-lamp. The cornea and biprisms are illuminated with cobalt blue light from the slit-lamp. Biprism is then advanced until it just touches the apex of cornea. At this point two fluorescent semicircles are viewed through the prism. Then, the applanation force against cornea is adjusted until the inner edges of the two semicircles just touch. This is the end point. The intraocular pressure is determined by multiplying the dial reading with ten.
5. Contact lens – corneal fitting relationship and fitting of rigid contact lens
Fluorescein allows us to evaluate the physical fit of a contact lens, or the bearing relationship that exists between a transparent contact lens and the eye. A yellow-green glow indicates the presence of fluorescein and therefore clearance between the lens and cornea. A deep blue or black area indicates the absence of fluorescein and therefore the lens is touching the cornea. Between these two extremes, the varying thickness of the tear layer is observed by varying shades of green. Bubbles indicate an air space and appear black.
Note:
Injection fluorescein dye is indicated for:
- Vitreous fluorophotometry
- Fluorescein fundus angiography (FFA)
Contraindications:
- Hypersensitivity to the dye
- With soft contact lens (causes discoloration)

I need this for my research work