Go through the general principles of orthopedic examination before starting with knee examination.
EXPOSURE: From flanks to ankle
INSPECTION:
STANDING:
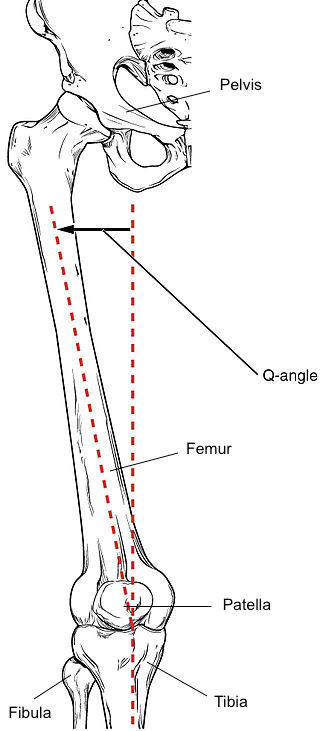
- Q-angle: ASIS → Center of patella ← Tibial tiberosity (M: 8-14; F: 15-17; Abnormal = >20)
- Degree of femoral anteversion/retroversion:
- Feet rotated inward or outward
- Squinting patella = Anteversion = Increased Q angle
- LLD: Compensation = Excessive pronation, toeing out (forefoot abduction) & flexed knee stance/gait
- Degree of genu varum/valgum: Standing so that patellae face anteriorly and the medial aspect of knees and medial malleoli of both extremities are close together as much as possible.
- 9-10 cm between malleoli = genu valgum
- 4 cm between knee – genu varum
- Degree of knee flexion: indicative of arthritic change
- Degree of genu recarvatum/hyperextension: Generalized ligamentous laxity/Patella alta
- Foot alignment: Subtalar supination = leg lengthen ;Subtalar pronation = leg shorten; excessive foot pronation = compensatory tibial internal torsion
- Also see:
- SEADS
- Side and Back: Position of spine, pelvis, hip, knee, ankle, feet
- Gait:
- Foot progression angle: Foot makes with imaginary straight line (external 10-15)
- Patellar progression angle: Patella makes with imaginary straight line (0)
- Valgus thrust: Lateral compartment OA, Medial ligament laxity
- Varus thrust: Medial compartment OA, Lateral ligament laxity
- Varus recurvatum: Posterolateral laxity
- Duck footed: Increased femoral anteversion
- Lateral perspective: Recarvatum thrust, Stiff knee gait, Flexed knee gait
SITTING:
- Patellar height: Normal, Alta, Baja
- Anterior surface of patella will be at an angle of 45 degrees to the floor and it will be placed centrally within the femoral trochlea.
- In patella alta, it will be more horizontal and in patella baja it will be more vertical.
- Active extension and flexion of knee:
- Crepitus: tight deep lateral retinacular structures, cartilaginous or synovial lesions
- Patellar tracking: Normally straight or slight/smooth gradual, lateral concave “C”
- J sign: Patella slips off laterally as knee approaches extension (instability)
- Normally the patella progressively become engaged in the trochlea with increasing degrees of knee flexion. Patella is pulled axially by the rectus femoris and the vastus intermedius and obliquely by the vastus lateralis and the vastus medialis. Static stabilization is provided by the medial and lateral parapatellar retinaculum. The shape of trochlea and the position of patella and the location of tibial tuberosity also influence patellar tracking. J sign is seen if the patella was laterally subluxed in full extension and suddenly moves medially and engages the trochlea during flexion.
- Quadriceps lag: Muscle atrophy, pain, effusion, reflex inhibition (capsular stretching/increased intra-articular pressure) or loss of mechanical advantage
SUPINE:
- Patellar tracking: Asked for isometric quadriceps contraction → Positive if patella tracks more laterally than superiorly
PALPATION
TEMPERATURE (joint line, patella, suprapatellar pouch, femoral/tibial condyles, popliteal fossa, calf)
ANTERIOR
- Test for effusion: Swelling without effusion = Synovial hypertrophy (doughy thickening which rolls under the finger)
- Juxta Patellar hollow: Disappears in lesser angle of flexion if effusion
- Cross fluctuation test (massive effusion): Left hand (suprapatellar pouch); Right hand (straddles front of joint below patella) → fluid impulse squeezing each hand alternately
- Patellar tap test (moderate effusion): Suprapatellar pouch emptied → tap patella back on femoral condyle (50 ml)
- Wipe/Bulge test (small effusion): Suprapatellar pouch emptied → Medial compartment emptied → Lateral aspect compressed → Ripple on flattened medial surface
- Patella and extensor apparatus:
- Patella: Anterior surface → Edges → Posterior surface (facet; by pushing to one side then to another i.e. glide test)
- Patellar tendon (tendinitis = Jumper’s knee)
- Hoffa’s fat pad (between patellar tendon and anterior capsule)
- Friction test: Moving patella up and down while pressing it lightly against the femur → Painful grating (central portion of articular cartilage damaged)
- Patellar apprehension test (Fairbank’s): Pressing patella laterally with thumb while flexing the knee slowly → +ve at 30 degrees
- Patellar grind test: Patella compressed with palm → flexion (distal patellar lesions = tender at early flexion; proximal patellar lesion = towards 90 degrees)
- Patellar tilt: Normally lateral border can be slightly lifted from horizontal (check lateral retinaculum tightness) or if excess medial border (lax medial retinaculum)
- Tibial tubercle
FLEX TO 90
- Lateral: Joint line, Fibular head, Femoral condyle, ITB
- Medial: Joint line, Tibial condyle, Femoral condyle, Pes anserinus
PRONE
- Baker’s cyst (below joint line) and Semimebranous bursa (superior to joint line)
- Muscles: Gracilis contract during hip adduction; Sartorius contract during hip abduction
MOVE
Flexion: 0-150 (Hamstrings, gracilis, sartorius, gastrocnemius, popliteus, TFL)
Heel pulled close to buttock = Compare heel to buttock distance on 2 sides
Extension: 0-15 (Quadriceps, ITB, TFL)
Passive = Legs lifted by the ankle by examiner from couch → knees should straighten fully
Active = Examiner slip hand under each knee → Ask patient to force knees into surface of couch OR test in sitting
ER/IR of tibia on femur: 0-10
Hip and knee 90 flexed → One hand steadies and feels knee → Other rotates foot
Waldron test: Unilateral squat → Slight pressure on patella with palm → Crepitus/locking = Patellofemoral chondropathy or Patellofemoral arthrosis
Ankle and Hip motions
MEASURE
- Apparent and true length; Femoral and tibial length
- Quadriceps wasting: 15 cm from joint line (>2 cm = significant)
- Calf wasting: 15 cm below joint line
- Effusion: 5 cm above joint line
NEUROLOGY and VASCULAR
LIGAMENT TESTING
MCL and LCL: Varus/Valgus stress test (Opening and soft or hard endpoint)
- 0 degrees: + Cruciate ligaments and Capsule
- 20-30 flexion: Relaxes secondary restraints → More specific for MCL/LCL
Grade 1: Joint space opening <2 mm C/L side
Grade 2: Joint space opening 3-5 more C/L side in flexion and <2 mm in extension
Grade 3: Joint space opening 5-10 mm more C/L side in flexion and extension
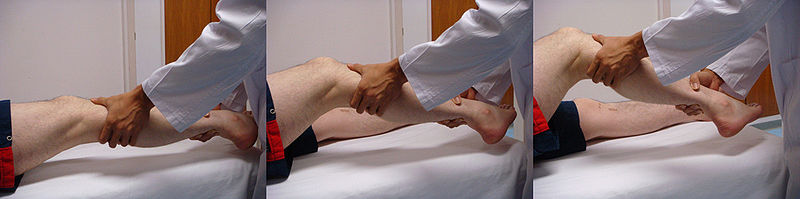
ACL and PCL:
- Flex knee to 90 and observe from side: Compare level of tibial tubercles (identify posterior sag or Godfrey sign i.e. PCL)
- If posterior sag + → Quadriceps active test (Drawer position with foot fixed → Asked to extend knee → If there is posterior sag, quadriceps will pull tibia forward)
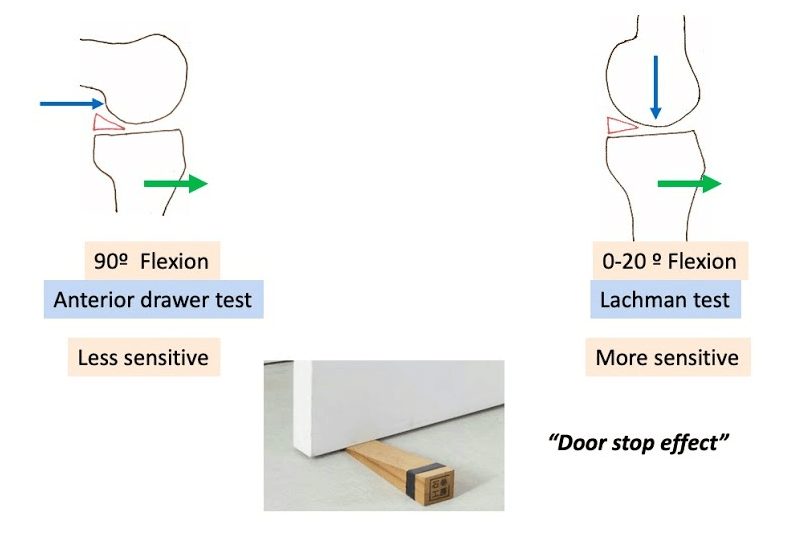
- Anterior and posterior drawer test: Thumbs on tibial tubercle (Soft/Hard endpoint)
Grade 1: 5 mm or less
Grade 2: 5-10 mm
Grade 3: >10 mm
- Slocum test: Anterior drawer in maximal IR or ER (+ posteromedial/posterolateral capsule)
- Lachman test: 20 degrees knee flexion (large thigh = use flexed knee of examiner to stabilize thigh)
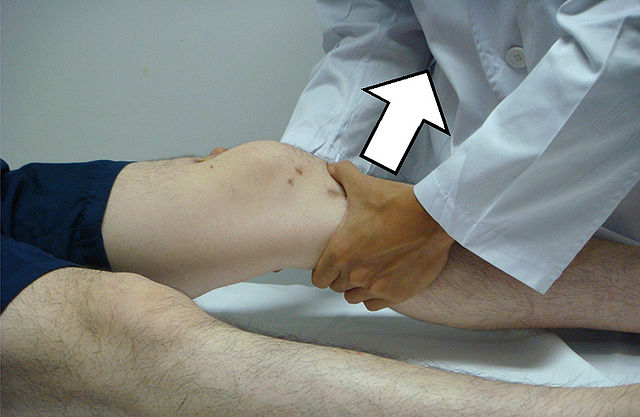
- Lelli’s (Lever) test: With the fist acting as a fulcrum under the calf and a second hand pushing down on the quadriceps (large arrow), the ruptured ACL is not able to counteract the downward force on the foot and the foot remains on the examination table
- Lever Sign test was more sensitive to correctly diagnose both acute and partial tears of the ACL, regardless of the elapsed time from injury, compared with other common manual tests
ROTATORY INSTABILITIES
- Posterolateral: LCL, poplitues tendon, posterolateral ligament complex, fabellofibular ligament (injury = tibia ER abnormally)
- External rotation recurvatum test: Knees extended → Grab both toes and lift foot off table → +ve = abnormal knee falls into recurvatum and varus, tibia ER compared to normal knee
- Modified posterolateral drawer test (Loomers test): Drawer and leg in ER → tibia rotates posteriorly
- Dial test: Prone → Thigh foot angle at 30 and 90 flexion → >10 degree difference = significant
+ at 30 and 90 = combined instability
+ at 30 = Isolated PLC injury - Reverse pivot (Jakob): Foot ER (Rt. hand) → Left hand on proximal tibia → Flex to 70 (Subluxation position) → Extend to 20 (Reduction)
- Anterolateral:
- Pivot shift: Foot IR → Valgus stress → At extension (sublux position) → Flex to 20 (Reduction)
MENISCUS
1. McMurray’s: Side of patient → Maximally flex hip and knee → Grasp foot (thumb lateral and other fingers inside) → Thumb of other hand against lateral aspect knee → ER/IR (loose meniscus trapping position) → Extend knee (Reduction) → Audible click or palpable click/thud
- Repeated several times with application of varus/valgus stress
- Most specific for tear of posterior horn of meniscus medial meniscus becomes more anterior in extension and external rotation.
Mnemonic: The heel points towards the meniscus tested.
2. Apley’s grind: Prone → Flex knee to 90 → Stabilize thigh with examiners knee → Compression (ER/IR = meniscus) → Distraction (ER/IR = Collateral ligaments)
3. Thessaly test: Affected knee flexed to 20 on single leg stance → Twist his/her body to one then other side for 3 times → Medial/Lateral joint line pain/locking
4. Squat test: Reproduces mechanical pain on affected knee
5. Duck walk (Childress test): Joint line pain
6. Steinmann test: Patient seated & with knee hanging loose over the edge of the table- knee flexed at least 90 degrees, foot grasped & tibia is sharply rotated into IR then ER- a meniscal lesion is demonstrated by pain at the appropriate joint line
7. Figure 4 test: for popliteomeniscal tears (lateral meniscus instability) → figure 4 → examiner pushes involved knee towards bed → Pain over lateral joint line
- If pain over medial joint line (posterior horn of medial meniscus = payr sign)
PATELLOFEMORAL
- Glide test: Slight flex → Move patella maximally medially and laterally (>1 quadrant medially and <2 quadrant laterally; retinacular tightness)
- Apprehension: With patella held in lateral position → flex knee
- Clarke’s test: Hand over suprapatellar pouch with gentle pressure on superior pole of patella → Ask to contract quadriceps or straight leg raise → Pain in patellofemoral joint (chondromalacia/arthritis)
OSTEOCHONDRITIS DISSECANS
Wilson’s test: Supine → Knee and hip 90 flex → Axial compression at knee by pushing proximally → Lower leg held in IR → Slowly extended → Pressure increased on medial cartilaginous surface (pain)
Designed to impinge ACL against OD located at lateral aspect of medial femoral condyle